---
title: How to track SharePoint page properties (Site Analytics)
description: Track SharePoint page properties, such as the page created date, as part of your intranet analytics with Site Analytics for Google Analytics.
---
[Skip to content](https://support.accelerator365.com/en/site-analytics-page-properties#main-content)
[.png?width=100&height=47&name=Accelerator%20365%20Logo%20(Colour%20+%20No%20Text).png)](https://support.accelerator365.com/?hsLang=en)
- [Home](https://support.accelerator365.com/en)
- [Getting started guides](https://support.accelerator365.com/en/getting-started)
- Product support
Show submenu for Product support
- [Apps](https://support.accelerator365.com/en/apps)
- [Solutions](https://support.accelerator365.com/en/solutions)
- [Look Book support](https://support.accelerator365.com/en/look-book)
- [Pricing support](https://support.accelerator365.com/en/pricing)
- [Technical support](https://support.accelerator365.com/en/technical)
- [Accelerator 365 website](https://accelerator365.com/)
Open main navigation
Close main navigation
- [Home](https://support.accelerator365.com/en)
- [Getting started guides](https://support.accelerator365.com/en/getting-started)
- Product support
Show submenu for Product support
- [Apps](https://support.accelerator365.com/en/apps)
- [Solutions](https://support.accelerator365.com/en/solutions)
- [Look Book support](https://support.accelerator365.com/en/look-book)
- [Pricing support](https://support.accelerator365.com/en/pricing)
- [Technical support](https://support.accelerator365.com/en/technical)
- [Accelerator 365 website](https://accelerator365.com/)
- [Contact us](https://accelerator365.com/pages/contact)
[Contact us](https://accelerator365.com/pages/contact)
Hello, how can we help you?
- There are no suggestions because the search field is empty.
1. [Accelerator 365 Knowledge Base](https://support.accelerator365.com/en?hsLang=en)
2. [Apps](https://support.accelerator365.com/en/apps?hsLang=en)
3. [Site Analytics](https://support.accelerator365.com/en/apps?hsLang=en#site-analytics)
# How to track SharePoint page properties (Site Analytics)
## The Site Analytics app supports tracking page properties from SharePoint.
Site Analytics can capture properties from a SharePoint page - such as default and custom metadata columns on the Site Pages library - and send them as part of an event to Google Analytics. This allows you to report on page-level metadata directly within your Google Analytics reports.
Throughout this guide, we'll use a single example: tracking the **Created** column on the Site Pages library.
---
### Step 1: Find your column's internal name
Every SharePoint column has an internal name, which the system uses to reference it, and this can differ from its display name (the label shown to editors). You'll need the internal name to configure Google Tag Manager, Google Analytics, and SharePoint consistently, so it's worth finding this first.
**Tip:** To find a column's internal name, navigate to the Site Pages library \> Settings \> Library settings. Click on the column, and check the end of the URL in your browser - the value after `&Field=` is the internal name.
Here are some common default SharePoint column internal names that you may wish to track:
| Column | Internal name |
| --- | --- |
| Created | Created |
| Created By | Author |
| Modified | Modified |
| Modified By | Editor |
| Audience | \_ModernAudienceTargetUserField |
These default SharePoint columns are already available in every Site Pages library, so no setup is required to start tracking them:
---
### Step 2: Google Tag Manager configuration
To track a page property, you first need to make it available to Google Tag Manager. This means creating a variable that reads the value from the page, then adding it to the event you'd like the property to be tracked against.
1. Navigate to your Google Tag Manager workspace, click **Variables**, then under **User-Defined Variables** click **New**.
2. Choose a **Variable Type** - select **Data Layer Variable** under the Page Variables section.
3. In the **Data Layer Variable Name** field, enter the column's internal name in lowercase, prefixed with `sp_`. For our example, this would be **sp\_created**.
4. Use the same name to title the variable at the top of the panel.
5. All other fields can remain unchanged. Click **Save**.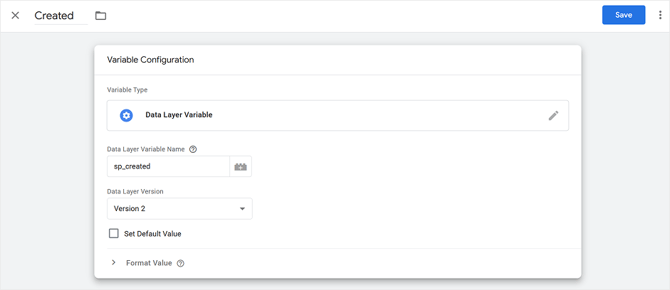
6. Next, add the new data layer variable to each event parameter where you want it tracked - for example, page view, scroll, or click events. You can find this in the **Variables** section. Open the relevant event parameters variable - for a page view, this is **A365 Page View event parameters**.
7. Click into the variable configuration to edit it, then click **Add parameter**, and select your newly created data layer variable.
8. For our example, we'll set the Event parameter name to **sp\_created**.
9. In the **Value** column, select your data layer variable using the + icon - this should appear formatted in double curly brackets, e.g. ``.
10. Click **Save**, then publish your container using the **Submit** button.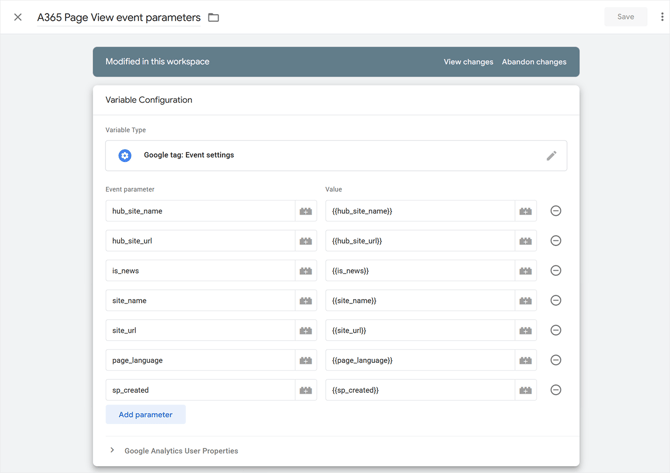
---
### Step 3: Google Analytics configuration
Next, create a matching custom dimension in Google Analytics so the new parameter can be filtered and reported on.
1. Navigate to your Google Analytics property and click **Admin** (bottom left).
2. Under Data display, click **Custom definitions**.
3. Click **Create custom dimension**.
4. Enter the dimension details for your page property: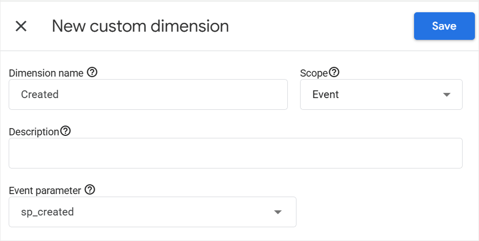
5. Click **Save**.
---
### Step 4: SharePoint configuration
Finally, configure the Site Analytics web part to collect and send the page property.
1. If you haven't already connected your GTM container ID, follow the steps in our [Connecting Google Tag Manager to SharePoint](https://support.accelerator365.com/en/site-analytics-connecting-gtm-to-sp?hsLang=en) guide.
2. Navigate to the Site Analytics configuration panel in SharePoint.
3. Click **Advanced mode**.
4. Add a `sitePagesProperties` section to your JSON, listing the **internal name** of each field you want to track.
Following our example, the JSON below instructs Site Analytics to retrieve the Created column from the Site Pages library:
```
{ "version": 2, "trackingId": "[Insert GTM container ID]", "custom": false, "sitePagesProperties": [ { "field": "Created" } ]}
```
5. **Before clicking Save**, ensure that custom scripts are enabled on your SharePoint site. Without this, your configuration will not be saved. [Learn how to enable custom scripts](https://support.accelerator365.com/en/technical/how-to-enable-custom-scripts?hsLang=en).
6. Click on **Save**. The Site Analytics app will validate your configuration.
**Note:** Most fields, including Created, only ever hold a single value, so no further configuration is needed.
Lookup, Person, and Managed Metadata columns are the exception - these store two values (a display value and an ID). These column types support an optional `format` property on the field when setting the JSON in Site Analytics.
Taking a Person column type as an example, the following formats can be set in the JSON:
- No format set (default) - sends the display value only, e.g. John Smith
- `full` - sends the display value and ID separated by a semicolon (`;`); if the field has multiple values (e.g. two people selected), each person's pair is separated by a pipe (`|`) , e.g. John Smith;jsmith@accelerator365.com|Jane Doe;jdoe@accelerator365.com
- `displayName` - sends the display value only, e.g. John Smith
- `id` - sends the ID value only, e.g. jsmith@accelerator365.com
---
### What to expect
**How do I know it's working?**
The easiest way to check is in Google Analytics: go to **Reports \> Realtime overview**, then look for your event under the **Event count by Event name** card. Clicking on it will show you the parameters that were sent, including your new page property.
**Note:** If you've just updated an existing Site Analytics configuration, there's some caching involved, so this may not appear immediately. Clearing your browser cache before checking the Realtime report can help confirm this sooner.
**What happens if the SharePoint column I've configured doesn't exist on a site?**
Site Analytics will simply send a blank value for that page, so you'll see it come through empty in your reports.
**What happens if the column exists but has no data?**
Same here - you'll see a blank value for that page.
- [Getting started](https://support.accelerator365.com/en/getting-started?hsLang=en)
- [Apps](https://support.accelerator365.com/en/apps?hsLang=en#main-content)
- [Accordion](https://support.accelerator365.com/en/apps?hsLang=en#accordion)
- [Advent Calendar](https://support.accelerator365.com/en/apps?hsLang=en#advent-calendar)
- [Alerts](https://support.accelerator365.com/en/apps?hsLang=en#alerts)
- [Anniversaries](https://support.accelerator365.com/en/apps?hsLang=en#anniversaries)
- [Audience Subscription](https://support.accelerator365.com/en/apps?hsLang=en#audience-subscription)
- [Back to Top](https://support.accelerator365.com/en/apps?hsLang=en#back-to-top)
- [Before and After](https://support.accelerator365.com/en/apps?hsLang=en#before-and-after)
- [Carousel](https://support.accelerator365.com/en/apps?hsLang=en#carousel)
- [Countdown Calendar](https://support.accelerator365.com/en/apps?hsLang=en#countdown-calendar)
- [FAQ](https://support.accelerator365.com/en/apps?hsLang=en#faq)
- [Gauge](https://support.accelerator365.com/en/apps?hsLang=en#gauge)
- [Glossary](https://support.accelerator365.com/en/apps?hsLang=en#glossary)
- [Image Map](https://support.accelerator365.com/en/apps?hsLang=en#image-map)
- [Launchpad](https://support.accelerator365.com/en/apps?hsLang=en#launchpad)
- [My Calendar](https://support.accelerator365.com/en/apps?hsLang=en#my-calendar)
- [My Contacts](https://support.accelerator365.com/en/apps?hsLang=en#my-contacts)
- [My Emails](https://support.accelerator365.com/en/apps?hsLang=en#my-emails)
- [Noticeboard](https://support.accelerator365.com/en/apps?hsLang=en#noticeboard)
- [Page Authors](https://support.accelerator365.com/en/apps?hsLang=en#page-authors)
- [Page Breadcrumbs](https://support.accelerator365.com/en/apps?hsLang=en#page-breadcrumbs)
- [Page Feedback](https://support.accelerator365.com/en/apps?hsLang=en#page-feedback)
- [Page Tags](https://support.accelerator365.com/en/apps?hsLang=en#page-tags)
- [Page Tour](https://support.accelerator365.com/en/apps?hsLang=en#page-tour)
- [Pages Directory](https://support.accelerator365.com/en/apps?hsLang=en#pages-directory)
- [People Directory](https://support.accelerator365.com/en/apps?hsLang=en#people-directory)
- [Poll](https://support.accelerator365.com/en/apps?hsLang=en#poll)
- [Rate My Day](https://support.accelerator365.com/en/apps?hsLang=en#rate-my-day)
- [Section Search](https://support.accelerator365.com/en/apps?hsLang=en#section-search)
- [Site Analytics](https://support.accelerator365.com/en/apps?hsLang=en#site-analytics)
- [Spotlight](https://support.accelerator365.com/en/apps?hsLang=en#spotlight)
- [Stock Price](https://support.accelerator365.com/en/apps?hsLang=en#stock-price)
- [Subscribe Now](https://support.accelerator365.com/en/apps?hsLang=en#subscribe-now)
- [Table of Contents](https://support.accelerator365.com/en/apps?hsLang=en#table-of-contents)
- [Tabs](https://support.accelerator365.com/en/apps?hsLang=en#tabs)
- [User Profile](https://support.accelerator365.com/en/apps?hsLang=en#user-profile)
- [Welcome](https://support.accelerator365.com/en/apps?hsLang=en#welcome)
- [Solutions](https://support.accelerator365.com/en/solutions?hsLang=en#main-content)
- [Content Manager Dashboard](https://support.accelerator365.com/en/solutions?hsLang=en#content-manager-dashboard)
- [Translator for SharePoint](https://support.accelerator365.com/en/solutions?hsLang=en#translator-for-sharepoint)
- [Look Book](https://support.accelerator365.com/en/look-book?hsLang=en)
- [Pricing](https://support.accelerator365.com/en/pricing?hsLang=en)
- [Technical](https://support.accelerator365.com/en/technical?hsLang=en#main-content)
- [General](https://support.accelerator365.com/en/technical?hsLang=en#general)
- [Maintenance](https://support.accelerator365.com/en/technical?hsLang=en#maintenance)
- [Troubleshooting](https://support.accelerator365.com/en/technical?hsLang=en#troubleshooting)
- [About](https://accelerator365.com/pages/about-us)
- [Blogs](https://accelerator365.com/blogs/updates)
- [Reply](https://www.reply.com/en)
- [Partners](https://accelerator365.com/pages/find-a-partner)
- [Contact](https://accelerator365.com/pages/contact)
- [License Agreement](https://accelerator365.com/pages/license-agreement)
- [Privacy Policy](https://www.reply.com/en/privacy-policy)
- [Service Level Agreement](https://accelerator365.com/pages/service-level-agreement)
[.png?width=60&height=29&name=Accelerator%20365%20Logo%20(Colour%20+%20No%20Text).png "Accelerator 365 logo")](https://accelerator365.com/)
Accelerator 365 by Reply